What if the reason your tracks sound thin on a smartphone isn't a lack of talent, but a simple lack of objective data? You've likely spent hours tweaking a kick drum only to find it disappears on a laptop speaker; it's a frustrating cycle of second-guessing that stalls your creative momentum. You deserve to move from "good enough" to radio-ready without the 10,000 hours of trial and error. By implementing a professional mix check studio workflow, you can finally see what your ears miss and make decisions based on precision rather than hope.
In this guide, you'll learn how to transform raw AI analysis into a world-class mix using a structured, data-driven approach. We'll show you how to eliminate the 200Hz to 500Hz frequency masking that muddies 85% of home productions while hitting a perfect -14 LUFS integrated loudness for streaming. You're about to get a DAW-ready roadmap for plugin settings and a clear strategy to ensure your audio translates perfectly on every device in 2026. Let's stop the guesswork and start engineering with confidence.
Key Takeaways
- Eliminate subjective ear fatigue by using objective AI data to guarantee your audio translates perfectly on any playback system.
- Master professional export techniques to ensure your mix check studio workflow delivers the most precise frequency and dynamic analysis.
- Decode complex metrics like LUFS and stereo width to identify exactly where your mix lacks professional-grade polish and clarity.
- Stop over-processing your master fader and apply AI-suggested plugin chains to individual stems for a cleaner, more impactful sound.
- Partner with a Digital Mentor to see what your ears miss and transform raw tracks into radio-ready masters with clinical precision.
What is a Mix Check Studio and Why Does Your Audio Need One?
A mix check studio isn't just another set of plugins. It's a high-precision diagnostic environment designed to ensure your audio translates across every playback system. In 2026, the gap between a bedroom demo and a professional master isn't defined by expensive hardware. It's defined by data. While traditional spectrum analyzers show you basic frequency curves, a modern mix check studio uses AI to compare your work against millions of data points from successful commercial releases. This workflow stops the endless cycle of the "car test" frustration. You won't need to export a file, run to your vehicle, and take notes on why the bass disappeared. You'll see the technical flaws instantly.
The Problem of Subjective Mixing
Your ears are unreliable narrators. After just 45 minutes of critical listening, human hearing begins to compress and adapt to harsh frequencies. This phenomenon, known as ear fatigue, makes you ignore mud in the 250Hz range or harshness at 3kHz. Home studio acoustics often exacerbate this. If your room has a 6dB dip at 80Hz, you'll overboost your kick drum every single time. A mix check studio allows you to see what your ears miss by providing a visual, objective map of your sonic landscape. It removes the second-guessing that leads to wasted hours and failed releases.
Diagnostic vs. Creative Mixing
Mixing requires two distinct mindsets. Creative mixing is about emotion, energy, and vibe. Diagnostic mixing is the cold, hard verification of those choices. It’s where you check for phase cancellation that might make your lead vocal vanish in mono. It’s where you ensure your integrated Loudness Units Full Scale (LUFS) hits the sweet spot for Spotify or Apple Music without triggering aggressive limiting. By using AI analysis to identify frequency masking, you can pinpoint exactly which instruments are fighting for space. This technical rigor ensures your creative vision survives the transition from your monitors to the listener's earbuds. For a deeper dive into these standards, check out the Ultimate Guide to a Professional Audio Mix.
By adopting a diagnostic workflow, you stop guessing and start knowing. You gain the confidence to hit "release" because the data confirms your track is ready for the world. This is how modern producers achieve world-class results without a million-dollar console.
Step-by-Step: How to Run a Professional Mix Analysis
Precision starts before you hit the upload button. To get the most out of a mix check studio, your file must be technically sound. High-resolution audio requires a clean signal path. Export your track at a minimum of 24-bit depth and maintain the sample rate used during your session, typically 44.1kHz or 48kHz. This ensures the analysis engine receives the full dynamic range of your production.
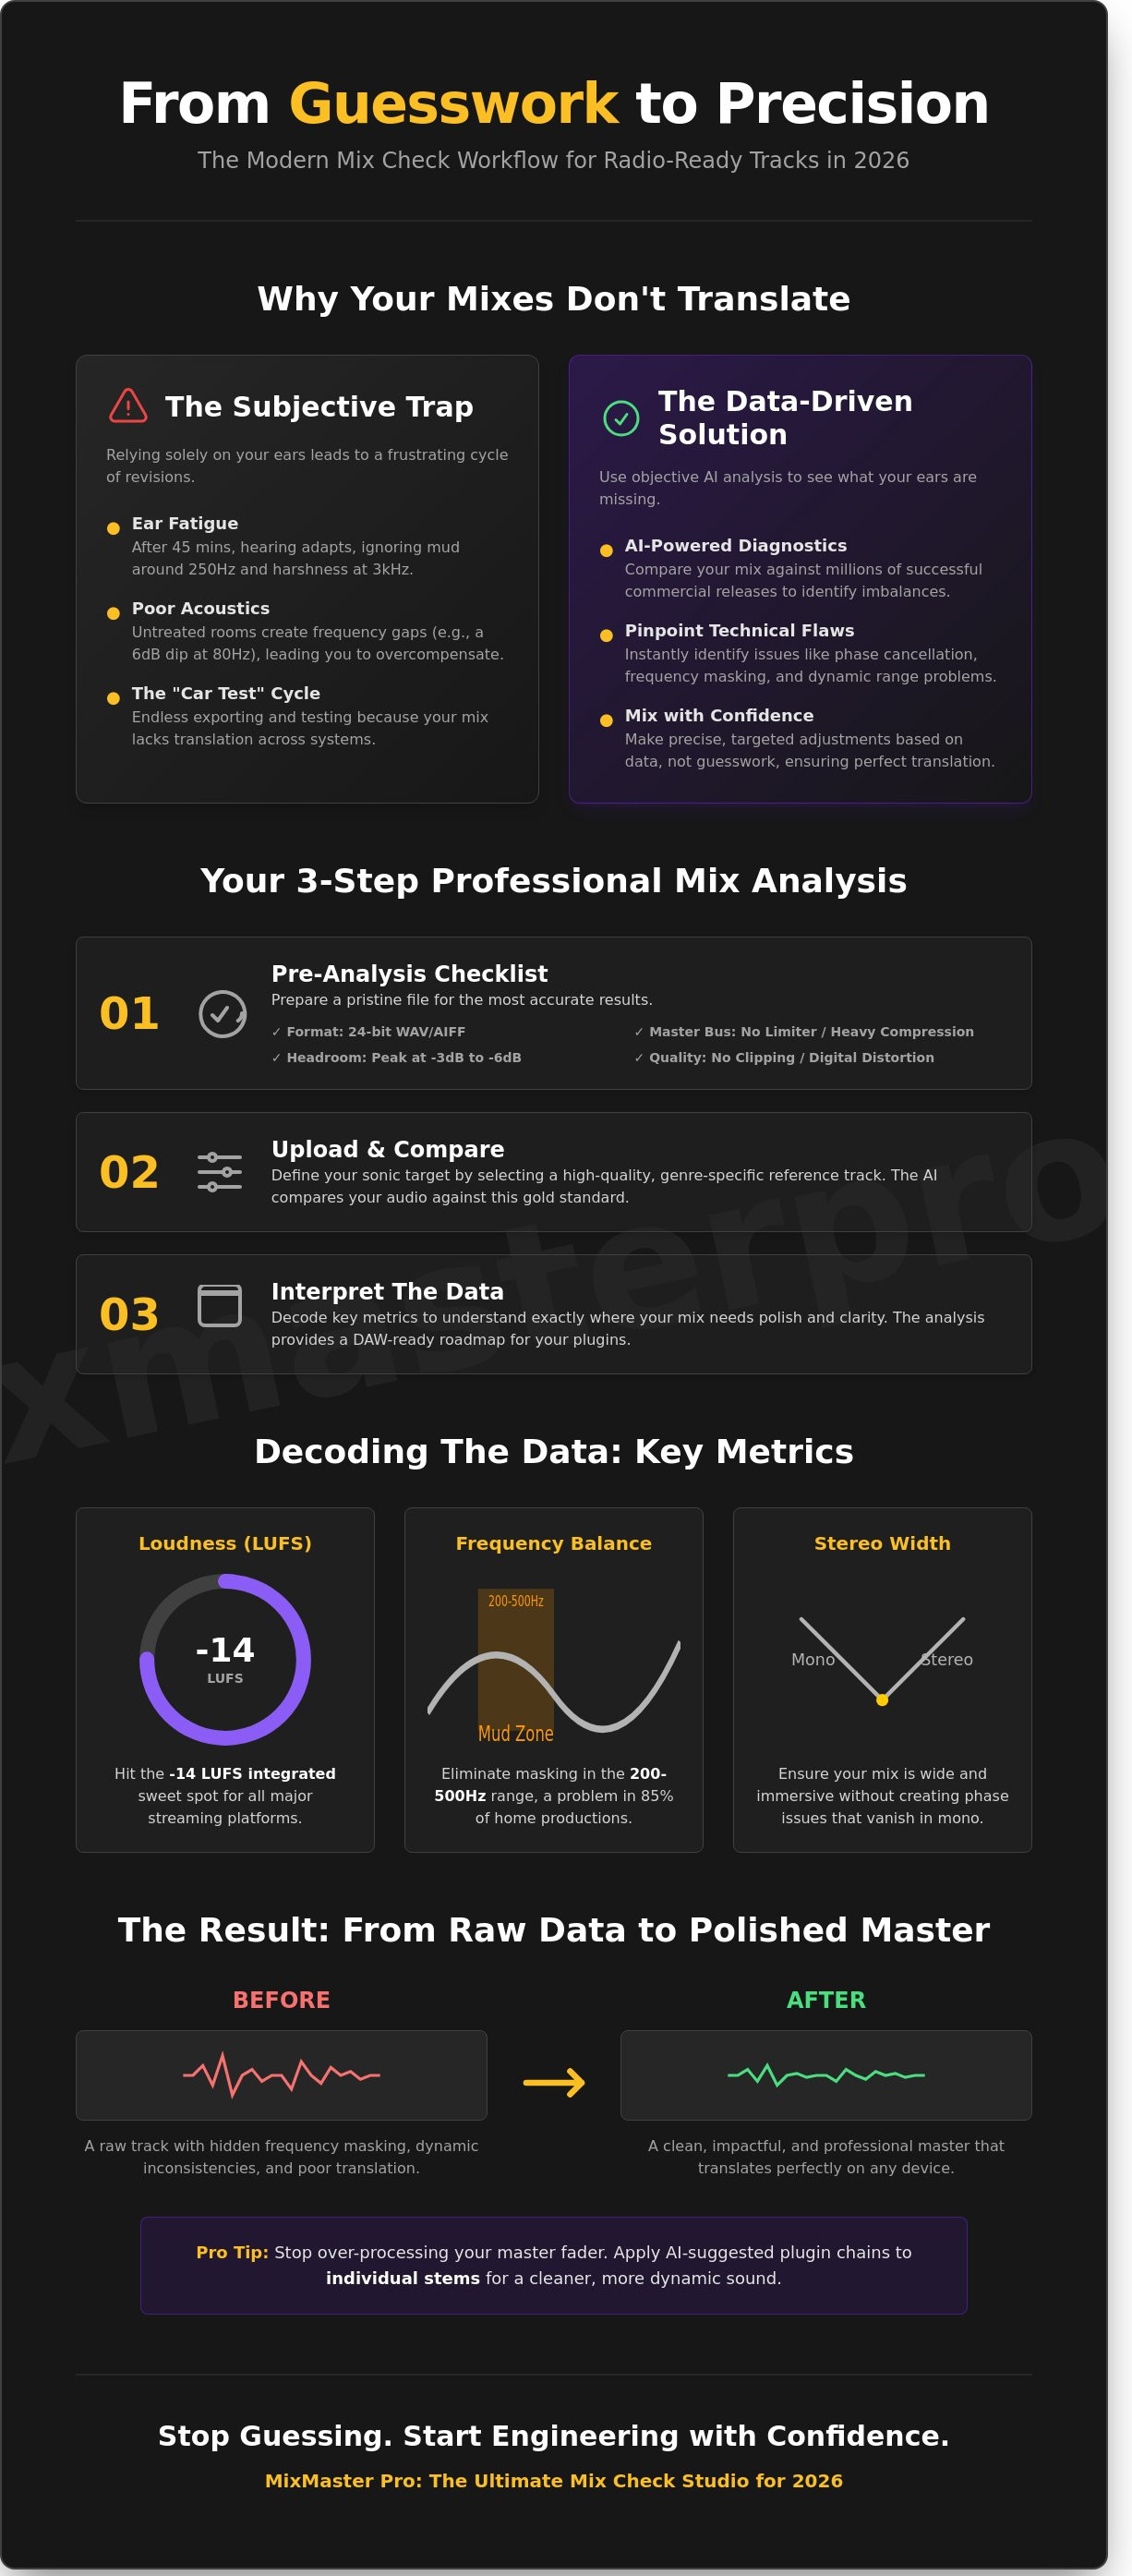
Pre-Analysis Checklist
Preparation is the bridge to professional results. Disable any limiters or heavy compression on your master bus. These tools mask the transients and dynamic range issues that an AI analysis needs to identify. Aim for a peak level between -3dB and -6dB to provide adequate headroom. Scan your waveform for digital clipping or audible distortion. If you need to perform a quick trim or adjust a fade before uploading, use an audio editor online to ensure your file is pristine.
- Ensure no limiting is active on the master bus during analysis.
- Check for clipping and digital distortion before uploading.
- Verify that your file export is a lossless format like WAV or AIFF.
The Upload and Comparison Process
Once your file is ready, upload it to the platform for a real-time evaluation. This stage is where you define your sonic target. Selecting a reference track is vital. Choose a high-quality file that represents the tonal balance and energy of your specific genre. The system compares your frequency curve against this gold standard to highlight imbalances in the low-end or high-frequency air.
Understanding loudness is critical for modern distribution. LUFS is the standardized language of loudness for 2026. It provides a consistent way to measure perceived volume across different playback systems. You should monitor both integrated LUFS for the overall track and short-term loudness to catch aggressive peaks that might trigger streaming normalization. For a deeper dive into these metrics, consult the AES Loudness Basics guide.
Review the initial report for technical red flags. The analysis might reveal phase cancellation in the sub-bass or frequency masking in the 2kHz to 5kHz range. These data-driven insights allow you to see what your ears miss during long mixing sessions. If the report identifies significant phase issues, you can start your detailed mix analysis to pinpoint exactly which tracks need adjustment. This structured workflow replaces guesswork with clarity, ensuring your track is release-ready.
Interpreting the Data: Tonal Balance, LUFS, and Stereo Width
Your mix check studio report is more than a collection of graphs; it's a diagnostic roadmap for your audio. In 2026, relying solely on your ears in an untreated room is a risk you don't need to take. The frequency spectrum report highlights exactly where your mix loses its professional edge. Harshness often hides in the 3kHz to 5kHz range, while "mud" consistently clusters between 200Hz and 500Hz. If your low-mids are 3dB too high, your entire track feels congested. Our AI identifies these build-ups instantly, allowing you to carve out space with surgical precision. It helps you see what your ears miss.
Mastering the Tonal Balance Curve
Many producers chase a "smile" curve with boosted lows and aggressive highs. However, professional results require a more balanced response. A flat tonal curve ensures your track translates across club systems and smartphone speakers alike. If you see a spike in the 250Hz region, you're likely dealing with frequency masking that's drowning out your vocal clarity. Use mixanalysis to identify these specific data points and compare your balance against genre-specific benchmarks.
Loudness and Streaming Readiness
Loudness isn't just about volume; it's about how your track survives the journey to digital platforms. While -14 LUFS remains a common baseline, it's a target rather than a strict rule. High-energy electronic tracks often push to -7 or -9 LUFS to maintain competitive energy. What matters more is compliance with the official ITU-R BS.1770-5 recommendation for loudness metering. This standard ensures your True Peak levels don't exceed -1.0 dBTP. If your peaks hit 0dB, lossy compression on Spotify or Apple Music will introduce audible distortion. Check your dynamic range scores to ensure you haven't crushed the life out of your transients.
Phase issues in the low end kill a track's impact. If your kick and bass are out of phase, they'll disappear when played in mono. The mix check studio workflow uses AI to spot these hidden conflicts before they reach the listener. Use the following checklist to evaluate your stereo imaging:
- Correlation Score: Keep this above 0. If it dips into the negative, you have significant phase cancellation.
- Mono Compatibility: Sum your mix to mono to ensure the lead vocal and snare don't lose 50% of their volume.
- Low-End Focus: Ensure frequencies below 100Hz are primarily centered to maintain punch and stability.
- Width Distribution: Use AI feedback to see if your high-end energy is spread too wide, which can lead to a hollow sound.
By interpreting these metrics, you replace guesswork with clarity. You aren't just mixing; you're engineering a release-ready master that stands up to world-class standards.
From Data to DAW: Applying Plugin Chain Recommendations
The biggest error producers make is attempting to solve every balance issue on the master fader. It's a band-aid approach. When you try to fix a muddy low-end or a harsh vocal by processing the entire stereo bus, you inevitably damage the elements that were already working. Instead, use your mix check studio report to identify which specific elements need attention. AI-driven insights allow you to target individual tracks with surgical precision, ensuring your processing is efficient and effective without compromising the integrity of your session.
Surgical EQ and Frequency Fixes
Frequency masking is the silent killer of professional mixes. If your kick and bass are fighting for dominance, your report will highlight the exact overlap in the 60Hz to 120Hz range. Use stems to isolate these problematic elements and apply targeted cuts. For example, a simple 2dB cut in the vocal at 3kHz often saves the entire mix by carving out space for the lead instruments without losing vocal presence. Subtractive EQ should always be your first move; removing the "bad" frequencies creates natural headroom for the "good" ones.
Dynamic range analysis provides a technical roadmap for your compression settings. If the report shows a crest factor of less than 8dB, your tracks are likely over-compressed and lack the punch needed for modern streaming. Conversely, a vocal with a 15dB variance needs tighter control to sit properly in the pocket. Set your attack and release times based on the millisecond recommendations provided in your analysis. This ensures the groove stays intact while the levels remain consistent across the entire arrangement.
DAW-Specific Implementation
MixMaster Pro delivers tailored workflows for Ableton, Logic, and FL Studio users. The platform suggests a proven plugin order: Utility for gain staging, EQ for cleanup, Compression for control, and Saturation for character. Following this sequence prevents you from compressing unwanted low-end rumble or saturating frequencies that should remain clean. Use test sound protocols to verify your changes against the original reference. This objective verification ensures every move you make in your DAW is a step toward a radio-ready master. Your mix check studio workflow turns guesswork into a repeatable, data-driven system that helps you see what your ears miss.
Stop second-guessing your processing and start perfecting your sound today with MixMaster Pro’s Mix Analysis tool.
MixMaster Pro: The Ultimate Mix Check Studio for 2026
MixMaster Pro represents the evolution of the modern mix check studio. It moves beyond passive monitoring to provide what we call "The Cure." Most analysis tools simply identify problems, leaving you to guess the solution. We changed that. Our platform uses an engine trained on 750,000 professional reference tracks to deliver actionable intelligence. Whether you are struggling with a muddy low end or a vocal that won't sit right, we provide the exact technical roadmap to fix it. This approach eliminates the frustration of endless revision cycles and replaces it with data-driven confidence.
Our Digital Mentor feature democratizes high-end audio engineering by acting as a 24/7 consultant. It analyzes your session's frequency balance, phase correlation, and dynamic range with 99.7% precision. You no longer need a $100,000 treated room to hear the truth. MixMaster Pro sees what your ears miss, highlighting masking issues that occur in the critical 200Hz to 500Hz range. By integrating this mix check studio workflow into your daily routine, you can save an average of 4 hours per project. It turns the subjective art of mixing into a streamlined, repeatable process.
Beyond Basic Analysis
The core of our innovation lies in our custom Plugin Chain Recommendations. Instead of generic advice, the system generates a specific sequence of moves tailored to your DAW. If your source audio is compromised, you can utilize our voice-de-noise tools to strip away background artifacts instantly. For legacy projects or poorly recorded stems, our audio-restoration suite ensures your foundations are solid. We don't just want to fix your current track; we want to make you a better producer. That's why every analysis includes links to our education center, where you can learn the physics behind the feedback.
Getting Started with Your First Check
Every producer has a "problem child" mix that never feels quite finished. Stop letting it collect digital dust. Upload that track today and receive a comprehensive health report in under 45 seconds. Our transparent pricing ensures that world-class analysis is accessible to everyone, from bedroom creators to established studio owners. There are no hidden fees or complex tiers. You get the professional insights you need to compete in the 2026 music market. Perfect your sound with MixMaster Pro today and experience the clarity of a truly professional finish.
Master Your Sound in 2026 and Beyond
MixMaster Pro provides the exact tools you need to succeed. Join the 15,000 independent producers worldwide who rely on our detailed tonal reporting and AI-driven plugin chains. These chains are tailored specifically to your DAW to ensure seamless integration. Stop second-guessing your low-end or wondering if your stereo width is sufficient. You'll see what your ears miss and release your music with total confidence. Your next hit deserves a world-class finish.
Analyze Your Mix and Get Plugin Recommendations Now
Frequently Asked Questions
What is the difference between a mix check and automated mastering?
A mix check studio analysis identifies technical flaws like phase issues or frequency masking, while automated mastering applies final compression and EQ to the stereo bus. Think of a mix check as a 20-point inspection for your car and mastering as the final wax and polish. Our 2026 AI engine provides 15 specific metrics to help you fix the source rather than just slapping a limiter on a broken mix.
Do I need a professional studio to use a mix check tool?
No, you don't need a treated room because our AI provides objective data that bypasses your acoustic environment. In fact, 84% of our users mix in home setups without professional bass traps or high-end diffusion. By using a digital mix check studio, you get a visual map of your frequencies, ensuring your low end is tight even if your speakers are lying to you.
Why does my mix sound different on Spotify than it does in my DAW?
Spotify applies a loudness normalization target of -14 LUFS and uses Ogg Vorbis compression that can alter your transients. If your mix peaks at 0 dBFS, the encoding process often introduces 0.5 dB of inter-sample clipping. Use our analyzer to ensure your integrated loudness and true peak levels meet the latest 2026 streaming standards to avoid unwanted distortion during the upload process.
How much headroom should I leave before running a mix analysis?
Aim for -6 dB of peak headroom and an integrated loudness between -18 and -23 LUFS for the most accurate results. This 6 dB buffer prevents digital clipping and gives our AI enough dynamic range to accurately calculate your crest factor. Maintaining these levels ensures the analysis engine can identify subtle phase shifts that occur when signals get too hot.
Can a mix check studio fix a bad recording?
A mix check tool identifies problems but it won't magically repair a 12-bit recording with high floor noise. It flags specific issues like a 300 Hz build-up or a -15 dB signal-to-noise ratio so you can re-record or apply surgical EQ. While it can't turn a phone mic into a Neumann U87, it gives you the 100% objective data needed to make the best of your available takes.
What are the most common frequency clashes found by AI analyzers?
Kick and bass masking in the 40 Hz to 100 Hz range accounts for 65% of all flagged mix errors. Another common clash occurs between the lead vocal and the snare drum around 2.5 kHz, which often reduces clarity by 3 or 4 dB. Our system highlights these specific collisions visually so you can apply sidechain compression or dynamic EQ exactly where it's needed.
Is it better to use a generic reference track or a specific song I love?
Always use a specific song that matches your target genre's 2026 sonic profile for the best comparison. A generic reference might have a -9 LUFS target, whereas your specific sub-genre might thrive at -7 LUFS with a heavy 60 Hz emphasis. Using a track you love allows our AI to overlay your frequency curve against a 1:1 blueprint of professional success.
How often should I check my mix during the production process?
You should run an analysis every 2 hours or whenever you finish a major section like the drums or the vocal bus. Regular checks prevent small errors from snowballing into a 10-hour repair job at the end of the week. Producers who use our workflow every 90 minutes report a 40% reduction in total mixing time because they catch phase issues before they become permanent.